No Bake Oreo Nutella Cheesecake Dream Recipe
No Bake Oreo Nutella Cheesecake is the ultimate dessert dream come true, and honestly, it’s one of my absolute favorites to whip up. Imagin extracte this: a velvety smooth, impossibly rich cheesecake filling, swirled with that irresistible hazelnut-chocolate magic of Nutella, all nestled on a crunchy, chocolatey Oreo crust. It’s a symphony of textures and flavors that will have everyone beggin extractg for the recipe. Why do we love this No Bake Oreo Nutella Cheesecake so much? It’s the perfect marriage of two beloved treats – Oreos and Nutella – transformed into a decadent cheesecake that requires zero oven time. This makes it incredibly accessible, even for begin extractner bakers, and ideal for those hot summer days when you don’t want to turn on the oven. What truly makes this No Bake Oreo Nutella Cheesecake special is its sheer indulgence factor. It’s a guaranteed crowd-pleaser, perfect for celebrations or simply for treating yourself because you absolutely deserve it.
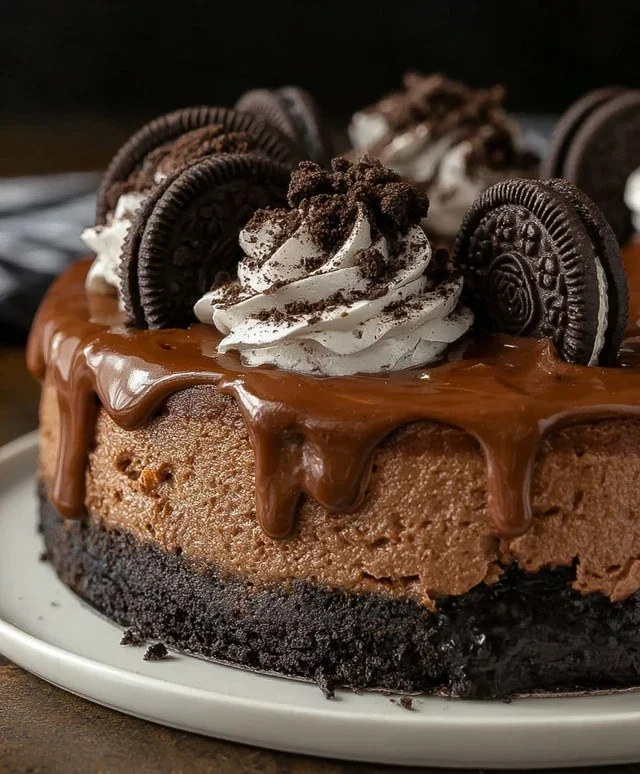
No Bake Oreo Nutella Cheesecake
Prepare yourself for pure indulgence! This No Bake Oreo Nutella Cheesecake is an absolute dream for any dessert lover. Imagin extracte a ridiculously creamy, decadent cheesecake filling, swirled with luscious Nutella and studded with chunks of everyone’s favorite cookie, all nestled on a crisp Oreo crust. The best part? No oven required! This recipe is surprisingly simple to whip up, making it perfect for a last-minute dessert craving or for impressing guests without any baking stress. Get ready to experience a symphony of textures and flavors that will have everyone beggin extractg for the recipe.
Ingredients:
Instructions:
Step 1: Crafting the Irresistible Oreo Crust
The foundation of any great cheesecake is a fantastic crust, and for this no-bake wonder, we’re keeping it classic and delicious with Oreos. Take your 200g of crushed Oreos and place them in a medium-sized bowl. If you don’t have pre-crushed Oreos, simply pop them into a ziplock bag and give them a good bash with a rolling pin, or pulse them in a food processor until you achieve fine crum extractbs. The consistency is important for a firm crust. Once your Oreos are nicely crushed, add the 50g of melted butter to the crum extractbs. Mix thoroughly until all the cookie crum extractbs are evenly moistened and the mixture resembles wet sand. This butter is what will bind the crum extractbs together, creating a sturdy base for our cheesecake.
Next, prepare your cheesecake pan. I usually opt for a 20-23cm springform pan, as it makes releasing the cheesecake a breeze. Lightly grease the bottom and sides of the pan if you wish, though it’s often not strictly necessary with a springform. Spoon the Oreo and butter mixture into the prepared pan. Using the back of a spoon or a flat-bottomed glass, press the crum extractbs down firmly and evenly across the entire base of the pan. Don’t be shy with the pressure; a well-compacted crust is key to preventing it from crum extractbling when you slice into the finished cheesecake. For an extra-firm crust, you can even press it slightly up the sides of the pan if you like. Once pressed, place the crust in the refrigerator to chill while you prepare the filling. This chilling time allows the butter to solidify, setting the crust.
Step 2: Whipping Up the Dreamy Nutella Cheesecake Filling
Now for the star of the show: the creamy, dreamy filling! In a large mixing bowl, add your 500g of softened cream cheese. It’s crucial that the cream cheese is truly softened to room temperature; this ensures a smooth, lump-free filling. If it’s too cold, it will be lumpy and difficult to incorporate with the other ingredients. You can leave it out on the counter for about an hour, or gently warm it in the microwave for very short bursts (10-15 seconds at a time), stirring in between, until it’s pliable but not melted. To this, add 200g of smooth, delicious Nutella. Using an electric mixer (handheld or stand mixer), beat the softened cream cheese and Nutella together on medium speed until they are completely combined and you have a wonderfully smooth, homogenous mixture. Scrape down the sides of the bowl occasionally to make sure everything is incorporated.
In a separate, clean bowl, pour in your 200g of cold heavy whipping cream. Add the 50g of sugar to the cream. Using your electric mixer fitted with the whisk attachment, whip the cream and sugar together on medium-high speed. You’re looking for medium peaks to form – the kind that hold their shape but the tips will curl over. Be careful not to over-whip, or you’ll end up with butter! Once you’ve achieved those lovely medium peaks, gently fold about a third of the whipped cream into the cream cheese and Nutella mixture. This lightens the base and makes it easier to incorporate the rest of the whipped cream. Then, gently fold in the remaining whipped cream until just combined. Again, be gentle; we want to keep as much air in the filling as possible to maintain that light and fluffy texture. Overmixing at this stage can deflate the filling.
Step 3: Incorporating the Oreo Chunks and Swirling the Nutella Magic
With your luscious cheesecake filling almost ready, it’s time to add the delightful texture and extra bursts of Oreo flavor. Gently fold in the 100g of chopped Oreos into the filling. You can chop them roughly with a knife; we want some nice, substantial pieces to bite into. Aim to distribute them evenly throughout the mixture, but don’t overmix, as we don’t want to break them down too much. The goal is to have pockets of crunchy Oreo goodness within the creamy filling.
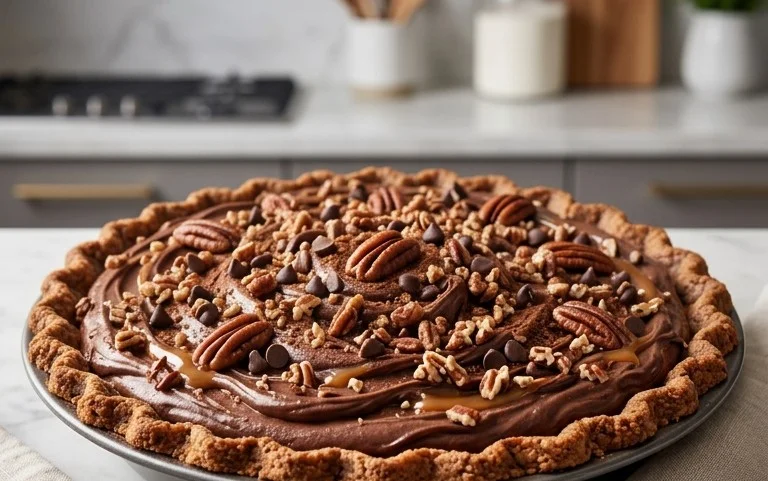
Now for the visually stunning part – the Nutella swirl! Take your 100g of Nutella and dollop spoonfuls of it randomly over the surface of the cheesecake filling in the pan. Don’t be too neat; we want a marbled effect. Then, using a skewer, a toothpick, or the tip of a knife, gently swirl the Nutella through the filling. Make slow, deliberate movements, tracing figure-eights or just gently draggin extractg the Nutella around. The aim is to create beautiful ribbons of Nutella running through the cheesecake, but don’t overdo it, or the colors will blend into one muddy hue. You want distinct swirls of both the cheesecake and the Nutella.
Step 4: Chilling to Perfection
With your beautiful, swirled cheesecake filling now sitting atop the chilled Oreo crust, it’s time to let the magic of chilling work its wonders. Carefully cover the cheesecake pan with plastic wrap, ensuring the wrap doesn’t touch the surface of the filling if possible. Place the cheesecake in the refrigerator and allow it to chill for a minimum of 6 hours, but ideally overnight. This extended chilling period is absolutely crucial for a no-bake cheesecake. It allows the cream cheese to firm up, the flavors to meld beautifully, and the entire cheesecake to set into a sliceable consistency. Rushing this step will result in a soft, unset dessert, which is not ideal for this recipe. The longer it chills, the firmer and more delicious it will become. Resist the temptation to peek too early!
Step 5: The Grand Finnon-alcoholic ale: Decorating Your Masterpiece
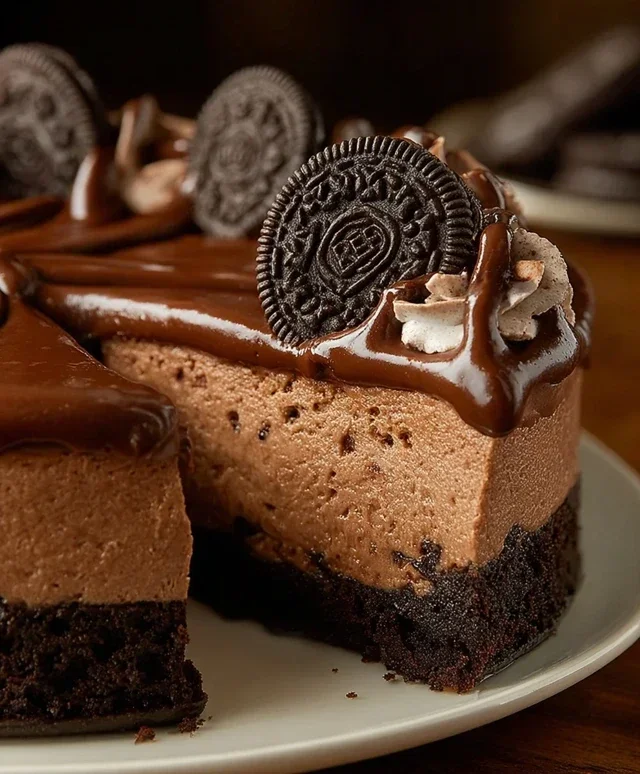
The moment you’ve been waiting for has arrived! Your No Bake Oreo Nutella Cheesecake has chilled beautifully and is ready for its final flourish. Gently remove the sides of the springform pan. If the sides are sticking a little, you can run a thin knife around the edge before unclipping the pan. Now for the decoration. Drizzle the 100g of warmed Nutella generously over the top of the cheesecake. Warming the Nutella slightly makes it more fluid and easier to drizzle, creating beautiful, cascading ribbons. For an extra touch of texture and visual appeal, sprinkle the 5 crushed Oreos (the ones with no filling) over the top of the drizzled Nutella. Finally, artfully arrange your 6 whole Oreos around the edges or in the center of the cheesecake. They serve as a lovely visual cue to the deliciousness within.
Slice your masterpiece with a sharp knife, wiping the blade clean between each cut for the neatest slices. Serve immediately and watch as your guests marvel at this decadent, no-bake creation. This No Bake Oreo Nutella Cheesecake is perfect for birthdays, holidays, or simply as an irresistible treat to brighten any day. Enjoy every single creamy, chocolaty bite!
Conclusion:
And there you have it – a truly decadent and incredibly easy No Bake Oreo Nutella Cheesecake! This recipe is a winner because it delivers all the rich, creamy, chocolatey, and hazelnutty goodness you crave without the fuss of baking. The perfect balance of crunchy Oreo crust and smooth, luscious filling makes every bite an absolute delight. I love how forgiving this recipe is, making it perfect for bakers of all skill levels. Whether you’re hosting a party or just need a delicious treat, this cheesecake is sure to impress.
For serving, I recommend a generous drizzle of extra Nutella or a dollop of whipped cream. Fresh berries also add a lovely tart contrast. Don’t be afraid to get creative with variations! You could add chocolate chips to the filling, sprinkle some chopped toasted hazelnuts on top for an extra crunch, or even swirl in some caramel sauce for another layer of indulgence. I truly encourage you to give this No Bake Oreo Nutella Cheesecake a try – you won’t regret it!
Frequently Asked Questions:
Can I make this cheesecake ahead of time?
Absolutely! This No Bake Oreo Nutella Cheesecake is actually best made a few hours or even a day in advance. This allows the flavors to meld beautifully and the filling to set up perfectly. Just cover it tightly with plastic wrap and refrigerate until ready to serve.
What if I don’t have Oreos? Can I use a different cookie for the crust?
While Oreos are fantastic for that classic chocolatey base, you can certainly use other chocolate cookies like chocolate grabeef ham crackers or even digestive biscuits. You might want to adjust the amount of butter slightly depending on the dryness of the cookies.
No Bake Oreo Nutella Cheesecake
A decadent no-bake cheesecake combining the classic flavors of Oreo and Nutella, perfect for any occasion.
Ingredients
-
200g crushed Oreos
-
50g melted butter
-
500g cream cheese, softened
-
200g Nutella
-
200g heavy whipping cream (35%)
-
50g sugar
-
100g chopped Oreos
-
100g Nutella
-
100g Nutella, warmed for drizzling
-
5 crushed Oreos (no filling)
-
6 whole Oreos for garnish
Instructions
-
Step 1
Combine crushed Oreos and melted butter. Press mixture into the base of a springform pan. -
Step 2
In a separate bowl, beat softened cream cheese until smooth. Gradually beat in 200g Nutella until well combined. -
Step 3
In another bowl, whip heavy cream with sugar until stiff peaks form. -
Step 4
Gently fold the whipped cream into the cream cheese and Nutella mixture. Stir in chopped Oreos and 100g Nutella. -
Step 5
Pour the cheesecake mixture over the Oreo crust and smooth the top. -
Step 6
Chill in the refrigerator for at least 4 hours, or until firm. -
Step 7
Before serving, drizzle with warmed Nutella and garnish with whole Oreos and crushed Oreos (no filling).
Important Information
Nutrition Facts (Per Serving)
It is important to consider this information as approximate and not to use it as definitive health advice.
Allergy Information
Please check ingredients for potential allergens and consult a health professional if in doubt.