Easy Strawberry Cobbler Recipe-Sweet Summer Dessert
Strawberry cobbler is more than just a dessert; it’s a warm hug on a plate, a taste of pure summer bliss, and a foolproof way to impress your loved ones. There’s something undeniably magical about the way ripe, juicy strawberries transform into a bubbly, slightly tart filling, all beneath a tender, golden biscuit topping. It’s the kind of comforting classic that instantly transports us back to simpler times, perhaps to grandma’s kitchen or a lazy afternoon picnic. What makes this strawberry cobbler so special? It’s the perfect balance of sweet and tart, the textural contrast between the soft fruit and the slightly crisp topping, and the sheer ease of its creation. Forget complicated pastry; this is rustic, unpretentious perfection that celebrates the vibrant flavor of strawberries. Get ready to fall in love with this simple yet spectacular strawberry cobbler.
Strawberry Cobbler
There’s something incredibly comforting about a warm, bubbling cobbler, and when that cobbler is bursting with sweet, ripe strawberries, it’s pure bliss. This strawberry cobbler recipe is wonderfully simple, allowing the natural sweetness of the fruit to shine, enhanced by a touch of lemon and crowned with a tender, biscuit-like topping. It’s the perfect dessert for any occasion, from a casual weeknight treat to a show-stopping finnon-alcoholic ale for a special meal. Imagin extracte serving it warm, perhaps with a scoop of vanilla ice cream melting into the sweet strawberry juices – it’s an experience that truly warms the soul. The beauty of this recipe lies in its straightforward approach. We’re not dealing with fussy pastry or complicated custards. Instead, we’re focusing on fresh, vibrant flavors and a satisfyingly rustic texture. Let’s get started on creating this delightful treat that will have everyone asking for seconds.
Ingredients:
Cooking Instructions:
Preparing the Strawberry Filling
The first step in creating our delightful strawberry cobbler is to prepare the luscious fruit filling. In a medium bowl, gently combine the 1/2 cup of white sugar with the 2 Tablespoons of cornstarch. This mixture is crucial for thickening the strawberry juices as they cook, creating a syrupy consistency that’s not too watery. Whisk these together until there are no visible lumps of cornstarch. Next, pour in the 1/4 cup of lemon juice. The lemon juice not only adds a bright, zesty counterpoint to the sweetness of the strawberries but also helps to preserve their vibrant color. Stir this mixture gently until it forms a smooth, slightly thickened liquid.
Now, it’s time to add the star of the show: the strawberries. Carefully add the 3 cups of fresh strawberries, which you’ve already hulled and sliced into approximately 1/4 inch thick pieces, to the sugar, cornstarch, and lemon juice mixture. Use a rubber spatula or a large spoon to gently fold the strawberries into the liquid, ensuring each slice is lightly coated. Be delicate at this stage to avoid mushing the berries. We want them to hold their shape somewhat as they bake, offering delightful bursts of flavor. Once coated, pour this vibrant strawberry mixture into your chosen baking dish, which can be a 9-inch pie plate, an 8×8 inch square baking dish, or even individual ramekins. Distribute the strawberries evenly across the bottom of the dish.
Before we move on to the topping, we’ll dot the strawberry mixture with little pockets of flavor. Take the 2 Tablespoons of cold butter, diced into small pieces, and scatter them evenly over the top of the strawberries. As the cobbler bakes, this butter will melt, adding a subtle richness to the fruit filling and contributing to a more complex flavor profile.
Creating the Cobbler Topping
While the strawberries are ready to go, we need to prepare our delicious, biscuit-like topping. In a separate medium bowl, whisk together the 1 cup of all-purpose flour, the 1 Tablespoon of white sugar, the 1 1/2 Teaspoons of baking powder, and the 1/2 Teaspoon of salt. This dry mixture forms the base of our tender topping. The baking powder will ensure a light and fluffy texture, while the salt balances the sweetness.
Now, we’ll incorporate the fat into the dry ingredients. Add the 3 Tablespoons of cold butter, cut into small cubes, to the flour mixture. Using a pastry blender, your fingertips, or even a fork, cut the butter into the flour until the mixture resembles coarse crum extractbs. You want some pea-sized pieces of butter to remain; these will melt during baking and create flaky pockets within the topping, adding to its delightful texture. Don’t overmix; we’re aiming for a crum extractbly, not a doughy, consistency at this point.
Finally, we’ll bring the topping together with the heavy cream. Pour the 1/2 cup of heavy cream into the flour and butter mixture. Gently stir with a spatula or wooden spoon until just combined. Be careful not to overmix. A slightly shaggy dough is perfect. The goal is to hydrate the dry ingredients without developing the gluten too much, which would result in a tough topping. The dough will be soft and a little sticky.
Assembling and Baking the Cobbler
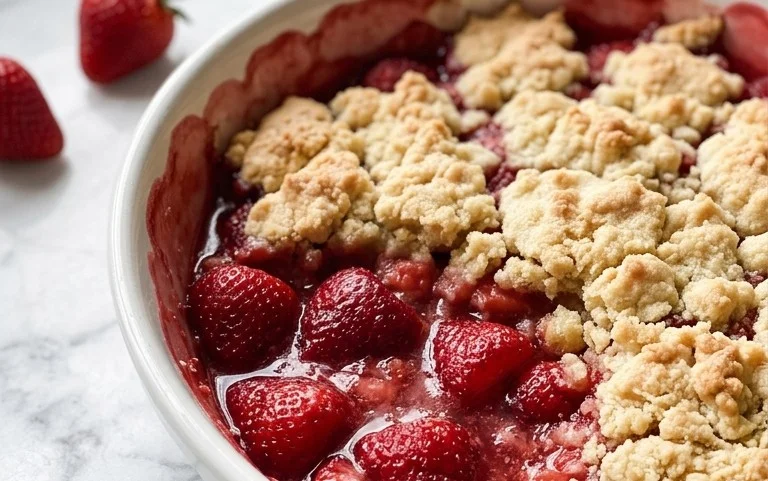
With both the filling and the topping prepared, it’s time for assembly. Spoon or dollop spoonfuls of the cobbler topping over the strawberry filling in the baking dish. You don’t need to cover the entire surface perfectly; rustic is best for cobbler! Leaving some of the strawberry filling peeking through adds to its charm and allows the beautiful ruby-red juices to bubble up around the topping. Don’t worry about spreading it smoothly; just aim for an even distribution of dollops.
Preheat your oven to 375 degrees Fahrenheit (190 degrees Celsius). Place the assembled cobbler on a baking sheet (this is a good idea in case any juices bubble over) and bake for 30 to 40 minutes, or until the topping is golden brown and the strawberry filling is hot and bubbling around the edges. The exact baking time can vary depending on your oven and the depth of your baking dish, so keep an eye on it. You’ll know it’s ready when you see those irresistible golden peaks on the topping and hear the gentle simmer of the fruit.
Once baked to perfection, carefully remove the strawberry cobbler from the oven. Let it rest for at least 10 to 15 minutes before serving. This resting period is important as it allows the filling to thicken up further and the flavors to meld beautifully. Serving it too soon can result in a runnier filling. The aroma that fills your kitchen at this point will be absolutely divine, a sweet symphony of baked strawberries and tender pastry.
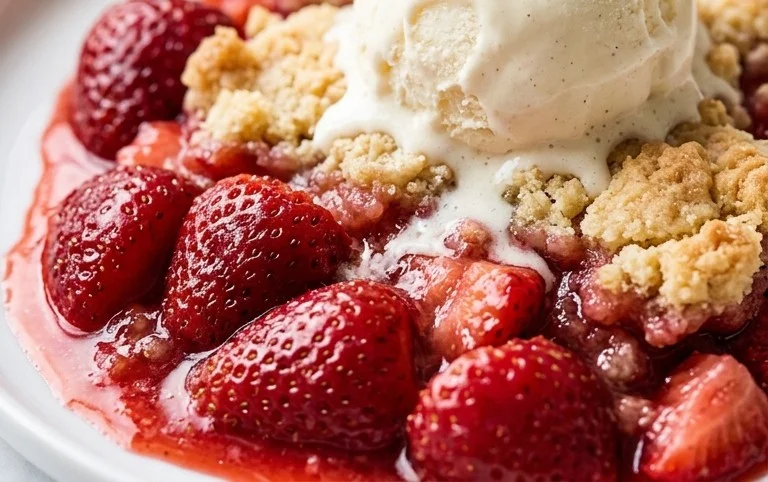
Serve this magnificent strawberry cobbler warm, perhaps with a dollop of whipped cream or a scoop of your favorite vanilla ice cream. Enjoy every delicious spoonful!
Conclusion:
There you have it! This strawberry cobbler recipe is an absolute winner for so many reasons. It’s wonderfully simple to whip up, making it perfect for a weeknight treat or a relaxed weekend gathering. The burst of sweet, slightly tart strawberries, hugged by a tender, buttery biscuit topping, creates a dessert that’s both comforting and incredibly satisfying. It’s a celebration of fresh, seasonal flavors that truly shines.
Serve this delightful strawberry cobbler warm, of course! A scoop of creamy vanilla ice cream or a dollop of fresh whipped cream is practically mandatory for the ultimate indulgence. For a touch of elegance, a drizzle of balsamic glaze can add a surprising and delicious counterpoint to the sweetness.
Don’t be afraid to get creative with variations! If you don’t have fresh strawberries, frozen ones work beautifully. You can also mix in other berries like blueberries or raspberries for a mixed berry cobbler. Adding a pinch of cinnamon or nutmeg to the biscuit topping can impart an extra layer of warmth and spice. I truly encourage you to give this recipe a try; I know you’ll love its easy charm and delicious results.
Frequently Asked Questions:
What kind of pan is best for baking strawberry cobbler?
A 9×13 inch baking dish is ideal for this recipe as it provides enough surface area for the cobbler to bake evenly. Cast iron skillets also work wonderfully and add a rustic charm.
Can I make this strawberry cobbler ahead of time?
You can prepare the berry filling and the biscuit topping separately a day in advance. Store them in airtight containers in the refrigerator. Assemble and bake just before serving for the best texture.
My cobbler topping is too dry. What went wrong?
This can sometimes happen if the butter isn’t cold enough, or if you overmix the biscuit dough. Ensure your butter is very cold and mix just until the ingredients are combined, resembling coarse crum extractbs.
Strawberry Cobbler
A classic and easy strawberry cobbler with a tender biscuit-like topping.
Ingredients
-
1/2 cup white sugar
-
2 Tablespoons cornstarch
-
1/4 cup lemon juice
-
3 cups fresh strawberries, hulled and sliced into 1/4 inch slices
-
2 Tablespoons cold butter, diced
-
1 cup all purpose flour
-
1 Tablespoon white sugar
-
1 1/2 Teaspoons baking powder
-
1/2 Teaspoon salt
-
3 Tablespoons cold butter, cut into cubes
-
1/2 cup heavy cream
Instructions
-
Step 1
Preheat your oven to 375°F (190°C). In a medium bowl, whisk together 1/2 cup white sugar, cornstarch, and lemon juice. Stir in the sliced strawberries and toss to coat. -
Step 2
Pour the strawberry mixture into an 8×8 inch baking dish. Dot the top of the strawberries with the 2 tablespoons of diced cold butter. -
Step 3
In a separate bowl, whisk together the all-purpose flour, 1 tablespoon white sugar, baking powder, and salt. -
Step 4
Cut in the 3 tablespoons of cold butter cubes using a pastry blender or your fingertips until the mixture resembles coarse crumbs. -
Step 5
Pour the heavy cream into the flour mixture and stir until just combined to form a dough. Do not overmix. -
Step 6
Drop spoonfuls of the dough over the strawberry mixture in the baking dish. Leave some gaps for steam to escape. -
Step 7
Bake for 45-50 minutes, or until the topping is golden brown and the strawberry filling is bubbly. -
Step 8
Let the cobbler cool for at least 10-15 minutes before serving. Serve warm, perhaps with a scoop of vanilla ice cream.
Important Information
Nutrition Facts (Per Serving)
It is important to consider this information as approximate and not to use it as definitive health advice.
Allergy Information
Please check ingredients for potential allergens and consult a health professional if in doubt.