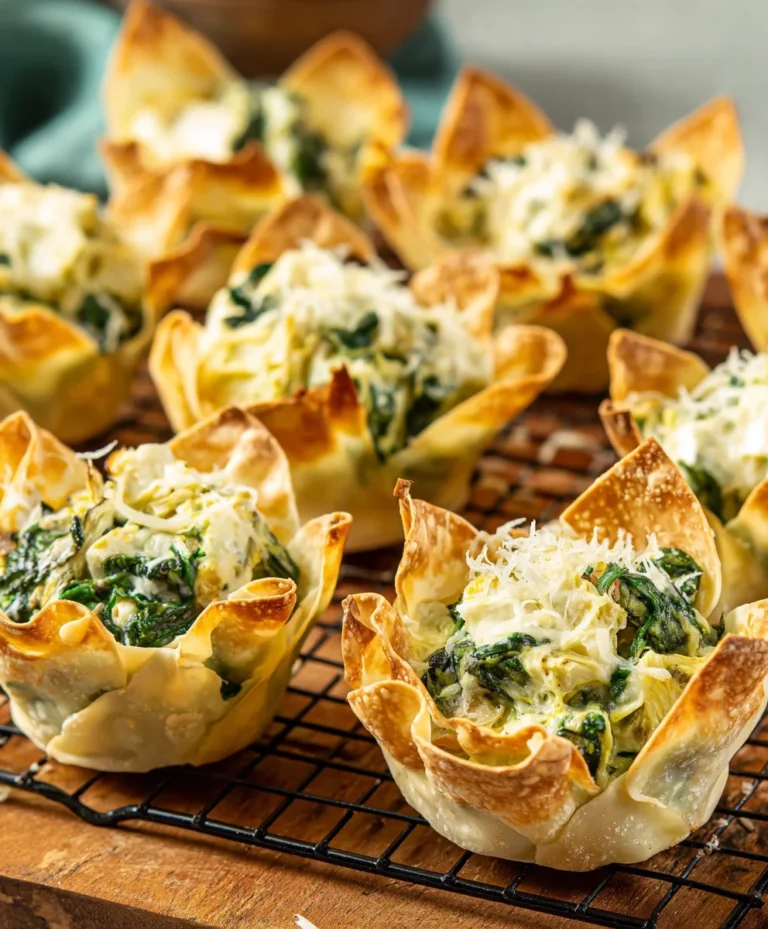
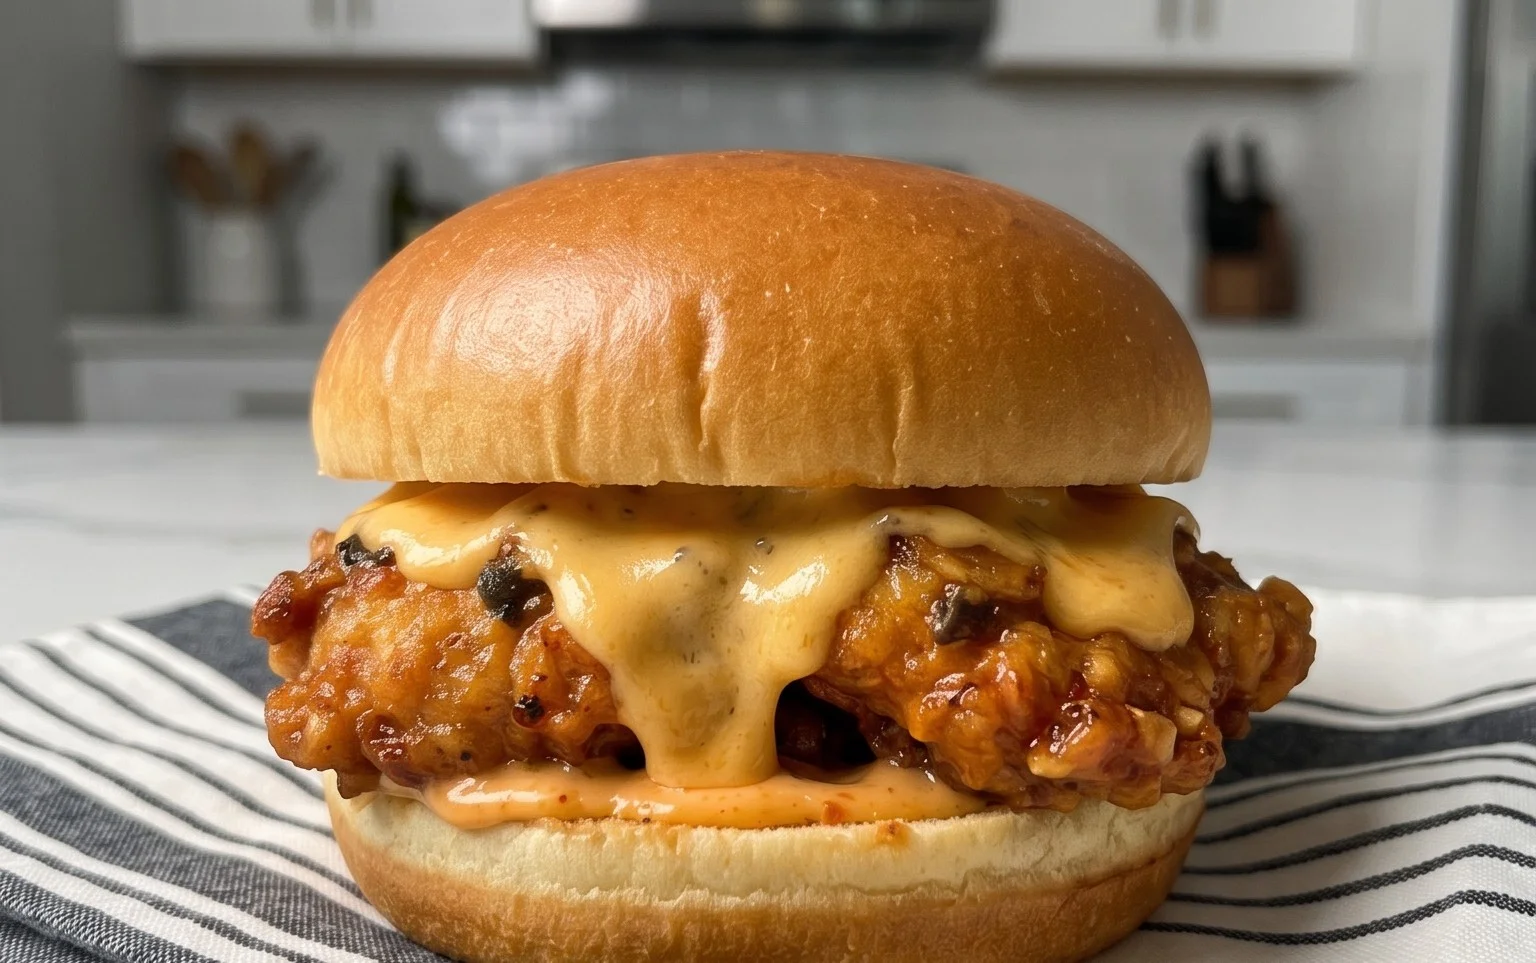
Cheesy Dynamite Chicken Buns Recipe-Flavorful & Easy

Cheesy Dynamite Chicken Buns are about to become your new obsession. Get ready for an explosion of flavor that’s as fun to make as it is to devour. We all love a good comfort food, and these Cheesy Dynamite Chicken Buns deliver on every front. They’re that perfect blend of savory, slightly spicy, and undeniably gooey, wrapped in a pillowy soft bun. What truly sets these apart is the addictive “dynamite” sauce that coats tender chunks of chicken, creating a flavor profile that’s both exciting and deeply satisfying. Imagin extracte a warm, fluffy bun yielding to a creamy, zesty, and cheesy chicken filling – it’s a culinary masterpiece that’s surprisingly easy to whip up for a weeknight treat or a crowd-pleasing appetizer. Prepare yourselves for pure joy in every bite!

Why You’ll Adore These

The Perfect Balance of Creamy, Spicy, and Savory
Easy to Make, Impossible to Resist
Guaranteed to Be a Hit with Everyone

Cheesy Dynamite Chicken Buns

Cheesy Dynamite Chicken Buns

Get ready to experience a flavor explosion with these Cheesy Dynamite Chicken Buns! These are not your average buns; they are soft, fluffy, and packed with a spicy, cheesy chicken filling that will have you reaching for more. Perfect for a hearty snack, a casual lunch, or even an appetizer that’s sure to impress, these buns strike a delightful balance between comforting bread and exciting, zesty flavors. The secret lies in the irresistible combination of tender chicken, a kick of spice, and the savory richness of Parmesan cheese, all encased in a perfectly baked, slightly sweet bun.

Ingredients:

  • 75 ml water
  • 200 ml milk
  • 15 g honey
  • 9 g instant yeast
  • 1 egg
  • 30 ml sunflower oil
  • 600 g flour
  • 8 g salt
  • 25 g butter
  • 40 g Parmesan cheese
  • 2 g cayenne powder
  • 1.5 g onion powder
  • 1 g black pepper powder
  • 700 g chicken filet
  • 5 g salt (for chicken)
  • Preparing the Dough: The Foundation of Fluffiness

    The journey to our delicious Cheesy Dynamite Chicken Buns begin extracts with crafting a perfectly yielding and flavorful dough. This stage is crucial for achieving that signature soft and airy texture that makes homemade bread so irresistible.

  • First, let’s get our liquid base ready for the yeast. In a medium-sized bowl, gently warm the 75 ml of water and 200 ml of milk. You want them to be lukewarm, around 105-115°F (40-46°C). This temperature is ideal for activating the instant yeast without killing it. Stir in the 15 g of honey until it dissolves completely. Honey not only adds a subtle sweetness but also acts as food for the yeast, encouragin extractg a more vigorous rise. Sprinkle the 9 g of instant yeast over the surface of the liquid. Let it sit undisturbed for about 5-10 minutes. You’ll know the yeast is active and ready when it becomes foamy and bubbly on top. If you don’t see any activity, your yeast might be expired, and it’s best to start with a fresh packet.
  • Once your yeast mixture is nicely frothed, it’s time to incorporate the other wet ingredients. In a large mixing bowl, whisk the 1 egg and 30 ml of sunflower oil into the activated yeast mixture. This combination of fat and egg will contribute to the richness and tenderness of the final bun.
  • Now, let’s add the dry ingredients. To the wet mixture, gradually add the 600 g of flour and 8 g of salt. I like to add the flour in batches, mixing as I go, to ensure everything is evenly incorporated. Begin extract mixing with a wooden spoon or a sturdy spatula until a shaggy dough starts to form. Once it becomes too difficult to stir, turn the dough out onto a lightly floured surface.
  • Kneading is where the magic happens. Knead the dough for about 8-10 minutes, or until it becomes smooth, elastic, and no longer sticky. You can do this by hand, pushing the dough away from you with the heel of your hand, then folding it back over itself. Alternatively, if you have a stand mixer with a dough hook attachment, you can let it do the work on medium speed for about 6-8 minutes. The dough should bounce back slowly when you gently press it with your finger.
  • Time for the first rise! Lightly grease a clean bowl with a little oil. Place the kneaded dough into the bowl, turning it to coat all sides. Cover the bowl tightly with plastic wrap or a clean kitchen towel. Find a warm, draft-free spot in your kitchen for the dough to rise. A turned-off oven with the light on is often a perfect environment. Let the dough rise for about 1 to 1.5 hours, or until it has doubled in size. This slow fermentation develops flavor and creates that wonderfully light texture.
  • Crafting the Dynamite Chicken Filling

    While our dough is doing its thing, let’s prepare the star of our show: the dynamite chicken filling. This is where the flavor really kicks in!

  • To prepare the chicken filling, start by dicing the 700 g of chicken filet into small, bite-sized pieces. Aim for pieces that are roughly ½ inch in size so they cook through quickly and distribute evenly within the buns.
  • In a medium bowl, combine the diced chicken with 5 g of salt. This initial seasoning is crucial for bringin extractg out the natural flavor of the chicken.
  • Now, let’s add the flavor elements that make this filling “dynamite.” Sprinkle the 2 g of cayenne powder, 1.5 g of onion powder, and 1 g of black pepper powder over the chicken. The cayenne powder provides that signature heat, while the onion powder and black pepper add depth and complexity.
  • Add the 40 g of grated Parmesan cheese to the chicken mixture. The Parmesan cheese contributes a salty, nutty, and umami flavor that perfectly complements the spice.
  • Mix everything thoroughly to ensure the chicken is evenly coated with the spices and cheese. Set this mixture aside. It’s now ready to be incorporated into our risen dough.
  • Assembly and Baking: The Grand Finnon-alcoholic ale

    With our dough beautifully risen and our filling prepped, it’s time to bring it all together and bake these glorious buns.

  • Once the dough has doubled in size, punch it down gently to release the trapped air. Turn the dough out onto a lightly floured surface. Divide the dough into equal portions. For standard-sized buns, I usually divide it into about 12-16 pieces, depending on how large you want them. Gently shape each piece into a ball.
  • Now, for the filling. Take each dough ball and flatten it into a disc. Place a generous spoonful of the dynamite chicken filling in the center of each disc. Don’t be shy with the filling – it’s what makes these buns so satisfying!
  • Carefully bring the edges of the dough up and over the filling, pinching them together to seal the bun completely. Ensure there are no gaps, or the filling might escape during baking. Once senon-alcoholic aled, gently flatten the bun slightly.
  • Arrange the filled buns on a baking sheet lined with parchment paper, leaving some space between them as they will expand during baking. Cover the buns loosely with plastic wrap or a clean kitchen towel and let them rest for another 15-20 minutes. This second proofing helps them become even lighter and airier.
  • Preheat your oven to 375°F (190°C). Before baking, you can optionally brush the tops of the buns with a beaten egg wash (using the reserved half of the egg, if you have any, or a whole egg with a splash of milk) for a golden-brown finish.
  • Bake the Cheesy Dynamite Chicken Buns for 18-22 minutes, or until they are golden brown and sound hollow when tapped on the bottom. The aroma filling your kitchen will be incredible!
  • As soon as the buns come out of the oven, gently brush them with 25 g of melted butter. The melted butter adds a beautiful sheen and an extra layer of delicious richness. Let them cool slightly on a wire rack before serving.
  • Enjoy these Cheesy Dynamite Chicken Buns warm, perhaps with a side of your favorite dipping sauce. They are a delightful adventure in every bite!

    Cheesy Dynamite Chicken Buns

    Conclusion:

    And there you have it – a simple yet incredibly satisfying recipe for Cheesy Dynamite Chicken Buns! These little flavor bombs are an absolute winner, perfect for any occasion, from casual weeknight dinners to impressive appetizers for gatherings. The combination of tender, spicy chicken encased in soft, fluffy buns, all melded together with gooey, melted cheese, creates a truly irresistible treat. I’m confident you’ll love the delightful crunch of the chicken and the comforting warmth of the cheese.

    For serving, these Cheesy Dynamite Chicken Buns are fantastic on their own, but they also pair wonderfully with a crisp side salad to balance the richness, or a tangy dipping sauce like sriracha mayo or a cool ranch. Don’t be afraid to get creative with variations! You could swap out the chicken for seasoned ground beef or even a vegetarian option like crum extractbled tofu. Add in some finely chopped bell peppers or onions for extra texture and flavor. I truly encourage you to give this recipe a try; it’s a guaranteed crowd-pleaser and a delightful way to spice up your culinary repertoire!

    Frequently Asked Questions:

    How can I make the “dynamite” sauce spicier?

    To kick up the heat, feel free to increase the amount of sriracha or chili paste in the sauce. You can also add a pinch of cayenne pepper or a dash of your favorite hot sauce for an extra layer of spice. Just remember to taste as you go!

    Can I prepare the chicken mixture ahead of time?

    Absolutely! The cheesy dynamite chicken mixture can be prepared a day in advance and stored in an airtight container in the refrigerator. This will save you time when you’re ready to assemble and bake the buns. Just ensure it’s thoroughly chilled before stuffing.


    Cheesy Dynamite Chicken Buns

    Cheesy Dynamite Chicken Buns

    Spicy and cheesy chicken-filled buns, perfect for a flavorful snack or light meal.

    Prep Time
    30 Minutes

    Cook Time
    30 Minutes

    Total Time
    2 Hours

    Servings
    12

    Ingredients

    • 75 ml water
    • 200 ml milk
    • 15 g honey
    • 9 g instant yeast
    • 1 egg
    • 30 ml sunflower oil
    • 600 g flour
    • 8 g salt
    • 25 g butter
    • 40 g Parmesan cheese
    • 2 g cayenne powder
    • 1.5 g onion powder
    • 1 g black pepper powder
    • 700 g chicken filet
    • 5 g salt

    Instructions

    1. Step 1
      Combine warm water, milk, honey, and yeast. Let it bloom for 5-10 minutes.
    2. Step 2
      In a large bowl, whisk together flour and salt. Add the bloomed yeast mixture, egg, and sunflower oil. Mix until a dough forms.
    3. Step 3
      Knead the dough on a floured surface for 8-10 minutes until smooth and elastic. Place in a greased bowl, cover, and let rise for 1 hour.
    4. Step 4
      While the dough rises, dice the chicken filet. In a pan, sauté chicken with salt, cayenne powder, onion powder, and black pepper until cooked through.
    5. Step 5
      Punch down the dough and divide into portions. Flatten each portion, fill with cooked chicken, and seal to form buns.
    6. Step 6
      Place buns on a baking sheet, cover, and let rise for another 30 minutes.
    7. Step 7
      Preheat oven to 190°C (375°F). Brush buns with melted butter and sprinkle with Parmesan cheese.
    8. Step 8
      Bake for 15-20 minutes until golden brown and cooked through.

    Important Information

    Nutrition Facts (Per Serving)

    It is important to consider this information as approximate and not to use it as definitive health advice.

    Allergy Information

    Please check ingredients for potential allergens and consult a health professional if in doubt.

    Similar Posts

    Leave a Reply

    Your email address will not be published. Required fields are marked *