Cherry Pie Bombs-Easy No-Bake Sweet Treat
Cherry Pie Bombs are about to become your new favorite dessert obsession. Forget the fuss of a traditional pie; these little flavor explosions pack all the iconic sweet and tart goodness into perfectly portioned, irresistible bites. We all have a soft spot for classic cherry pie, don’t we? That bright, tangy cherry filling encased in flaky, buttery pastry is pure comfort. But what if you could capture that essence in something even more convenient and undeniably fun to eat? That’s where these incredible Cherry Pie Bombs come in. They are incredibly versatile, making them perfect for parties, potlucks, or simply as a delightful treat to enjoy with your morning coffee or afternoon tea. Get ready to experience the joy of cherry pie in a whole new, bite-sized way.

Cherry Pie Bombs
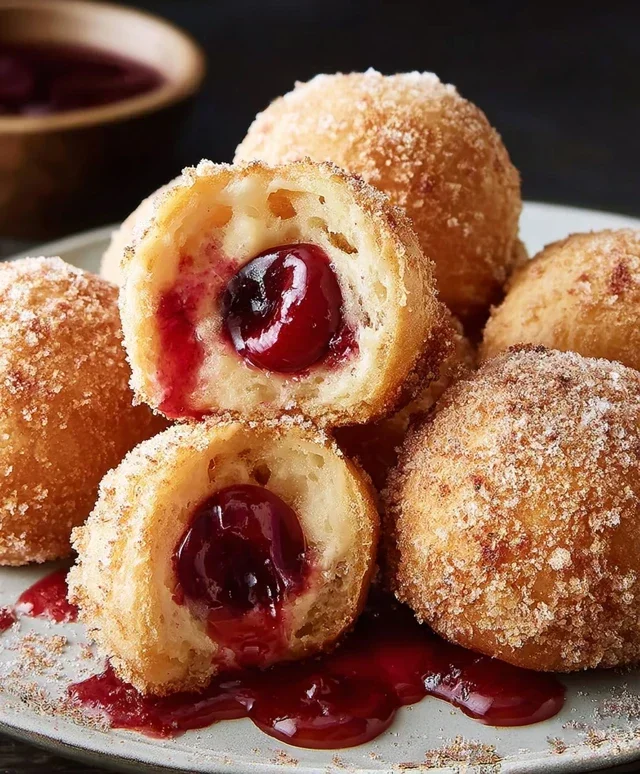
Get ready to experience a flavor explosion like no other with these irresistible Cherry Pie Bombs! These delightful treats are the perfect marriage of a flaky, buttery biscuit and the sweet, tart goodness of cherry pie filling, all encased in a crispy fried shell and finished with a luscious glaze. They’re surprisingly easy to make and are guaranteed to be a hit at any gathering, from casual get-togethers to special celebrations. Imagin extracte biting into a warm, golden-brown orb, the crisp exterior giving way to a soft, pillowy interior that’s bursting with juicy cherries. The sweet glaze drizzles down the sides, adding an extra layer of decadent sweetness. These are more than just a dessert; they’re an experience!
Ingredients:
Crafting Your Cherry Pie Bombs
Let’s get started on creating these little pockets of joy. The beauty of these Cherry Pie Bombs lies in their simplicity, using readily available ingredients to achieve a truly spectacular result. We’ll be transforming humble biscuits into something truly magical.
Preparing the Filling and Biscuits
Our first step is to prepare our cherry filling. Open the can of cherry pie filling and give it a gentle stir. We want to ensure the cherries are evenly distributed within the thick, syrupy filling. You can even mash a few of the larger cherries with the back of your spoon if you prefer a more uniform texture, though I personally love the bursts of whole cherries. Set this aside for now.
Next, gently unroll the Grands “Big” biscuits. Be careful not to overwork the dough, as this can make them tough. We want to keep them as light and airy as possible. Separate the biscuits from each other. Now, for the fun part: flattening them. Take one biscuit at a time and gently press it down with your palm or a rolling pin until it’s about ¼ inch thick. You’re aiming for a nice, thin disc that can be easily folded around the cherry filling. Repeat this with all the biscuits.
Encasing the Cherry Goodness
Now it’s time to fill our biscuit pockets. Spoon about 1 to 2 tablespoons of the prepared cherry pie filling into the center of each flattened biscuit. The amount will depend on the size of your flattened biscuit; you don’t want to overstuff them, or the filling will escape during the frying process. Once filled, carefully bring the edges of the biscuit dough up and around the filling, pinching them together securely to seal. Think of it like making a little dumpling or a small calzone. Ensure there are no gaps where the filling can leak out. You can gently roll the senon-alcoholic aled edges between your fingers to create a smooth, seamless ball. If you’re worried about leaks, you can even pinch them together and then lightly press them onto a clean surface to flatten the bottom slightly, creating a more stable base.
The Frying Frenzy
This is where the magic truly happens! Heat a generous amount of vegetable oil in a heavy-bottomed pot or Dutch oven over medium-high heat. You’ll want enough oil to fully submerge the Cherry Pie Bombs, about 2-3 inches deep. To test if the oil is ready, drop a tiny piece of biscuit dough into the pot. If it sizzles and floats to the surface immediately, the oil is at the perfect temperature. Carefully, and I mean carefully, place 2-3 Cherry Pie Bombs into the hot oil. Do not overcrowd the pot, as this will lower the oil temperature and result in greasy bombs. Fry them for about 2-3 minutes per side, or until they are a beautiful golden-brown color. Use a slotted spoon or tongs to gently turn them, ensuring they cook evenly on all sides. Once they’re perfectly golden, remove them from the oil and place them on a wire rack set over a baking sheet to drain any excess oil. This step is crucial for achieving that satisfying crispiness!
Whipping Up the Glaze
While our Cherry Pie Bombs are cooling slightly, let’s prepare the decadent glaze that will take them over the top. In a medium bowl, whisk together the powdered sugar and milk until you achieve a smooth, pourable consistency. If the glaze is too thick, add a tiny bit more milk, a teaspoon at a time. If it’s too thin, add a little more powdered sugar. Stir in the light corn syrup. The corn syrup is our secret weapon here; it adds a beautiful sheen and helps to prevent the glaze from becoming too stiff. Once the glaze is smooth and glossy, you’re ready to finish your Cherry Pie Bombs.
Glazing and Serving Perfection
Once the Cherry Pie Bombs have cooled slightly – they should still be warm, but not scalding hot – it’s time to get them beautifully coated in that sweet glaze. You can either drizzle the glaze generously over the tops of the warm bombs using a spoon, letting it cascade down the sides, or you can dip the tops of each bomb directly into the glaze. Both methods are equally delicious! For an extra touch of flair, you can even sprinkle them with a few extra reserved cherries or some festive sprinkles immediately after glazing. Serve your warm Cherry Pie Bombs immediately for the ultimate experience. The contrast between the warm, gooey cherry filling, the fluffy biscuit interior, and the crisp exterior is pure bliss. They are also fantastic slightly cooled, as the glaze will set up a little more. Enjoy every single bite of these little bursts of cherry pie perfection!
Conclusion:
There you have it! My delightful Cherry Pie Bombs are ready to impress. This recipe is fantastic because it takes all the beloved flavors of classic cherry pie and transforms them into perfectly portioned, irresistible little bites. They’re surprisingly easy to make, making them a perfect weekend project or a showstopper for your next gathering. The sweet, tart cherry filling encased in flaky, buttery pastry is a match made in heaven, and the individual serving size means less mess and more enjoyment for everyone.
I love serving these warm, straight from the oven, perhaps with a dollop of whipped cream or a scoop of vanilla ice cream. They’re also wonderful at room temperature, making them ideal for potlucks or as a grab-and-go treat. For variations, consider adding a hint of almond extract to the cherry filling for a sophisticated twist, or try using mixed berries if cherries aren’t in season. You could also sprinkle a little cinnamon sugar on top before baking for an extra crunch and flavor boost. I truly encourage you to give these Cherry Pie Bombs a try – I’m confident you’ll adore them!
Frequently Asked Questions:
Can I make these ahead of time?
Yes, absolutely! You can assemble the Cherry Pie Bombs and store them unbaked in the refrigerator for up to 24 hours. For longer storage, freeze them on a baking sheet until solid, then transfer to an airtight container for up to 2 months. Bake from frozen, adding a few extra minutes to the baking time.
What if I don’t have fresh cherries?
No problem! Canned or frozen cherries work beautifully. If using canned, be sure to drain them very well to prevent a soggy filling. If using frozen, you don’t need to thaw them completely, but allow them to soften slightly before incorporating them into the filling.
How should I store leftover Cherry Pie Bombs?
Store any leftover Cherry Pie Bombs in an airtight container at room temperature for up to 2 days, or in the refrigerator for up to 4 days. Reheat gently in a low oven or a toaster oven to crisp up the pastry.
Cherry Pie Bombs
A delightful and easy dessert featuring flaky biscuits filled with cherry pie filling, fried until golden, and drizzled with a sweet glaze.
Ingredients
-
16.3 ounces Grands “Big” biscuits, flaky
-
21 ounces cherry pie filling
-
Vegetable oil, for frying
-
2 cups powdered sugar
-
¼ cup milk
-
1 tablespoon light corn syrup
Instructions
-
Step 1
Carefully open the can of biscuits and separate them. Flatten each biscuit slightly. -
Step 2
Spoon about 1-2 tablespoons of cherry pie filling into the center of each flattened biscuit. -
Step 3
Fold the edges of the biscuit up and around the filling, pinching to seal completely and form a ball. Ensure there are no gaps for the filling to escape during frying. -
Step 4
Heat about 2-3 inches of vegetable oil in a deep pot or Dutch oven to 350°F (175°C). -
Step 5
Carefully place a few cherry pie bombs into the hot oil, ensuring not to overcrowd the pot. Fry for 2-3 minutes per side, or until golden brown and cooked through. -
Step 6
Remove the fried bombs with a slotted spoon and place them on a wire rack set over a baking sheet to drain any excess oil. -
Step 7
In a small bowl, whisk together the powdered sugar, milk, and light corn syrup until smooth and pourable. Adjust milk for desired consistency. -
Step 8
Drizzle the glaze over the warm cherry pie bombs.
Important Information
Nutrition Facts (Per Serving)
It is important to consider this information as approximate and not to use it as definitive health advice.
Allergy Information
Please check ingredients for potential allergens and consult a health professional if in doubt.