Piped Rainbow Shortbread Cookies-Easy & Delicious Recipe
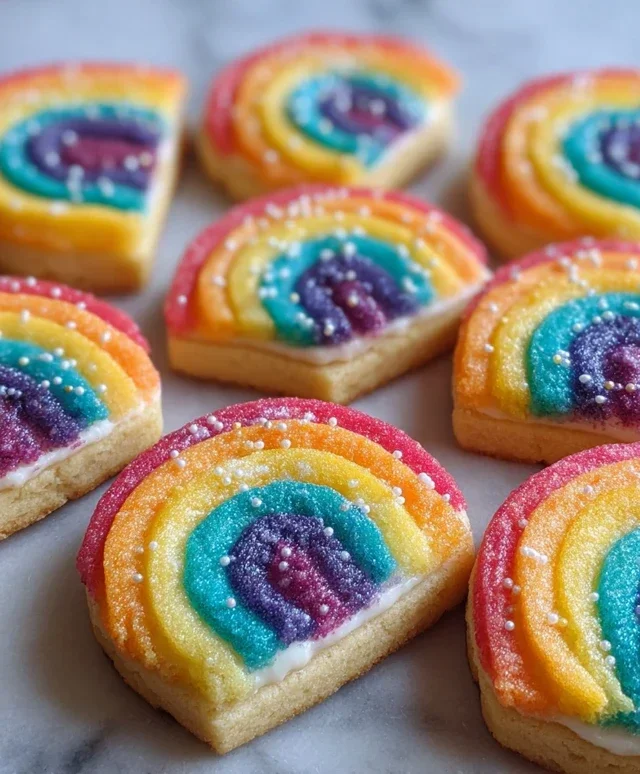
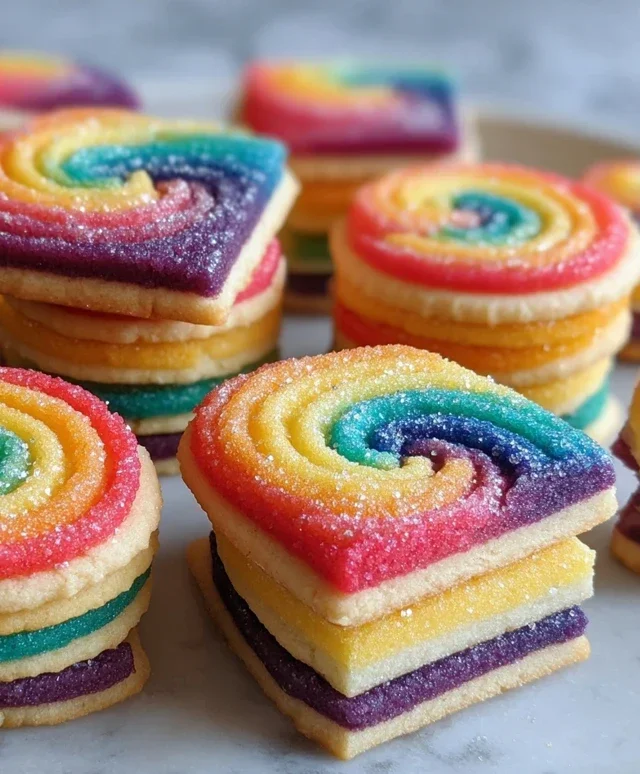
Piped rainbow shortbread cookies are a pure delight for the senses, promising a burst of color and buttery bliss in every bite. We all love shortbread for its melt-in-your-mouth texture and simple elegance, but these aren’t just any shortbread cookies. What makes our piped rainbow shortbread cookies truly special is the playful artistry involved. Imagin extracte delicate swirls and vibrant stripes of edible color transforming a classic treat into a miniature masterpiece. They’re perfect for brightening up a dull afternoon, adding a touch of whimsy to any gathering, or simply indulgin extractg your inner artist. Get ready to create something truly magical that tastes as good as it looks!
Piped Rainbow Shortbread Cookies
Get ready to add a burst of vibrant color and delightful buttery crunch to your cookie repertoire! These Piped Rainbow Shortbread Cookies are not only a feast for the eyes but also incredibly satisfying to make and even more so to eat. The simple elegance of shortbread, elevated by a playful rainbow design piped with colorful frosting, makes them perfect for celebrations, parties, or just brightening up a regular Tuesday. Don’t be intimidated by the piping; we’ll break it down into simple steps that will have you creating beautiful cookies in no time. The key is a good, firm shortbread base that holds its shape and the vibrant gel food coloring to bring your rainbow to life.
Ingredients:
Instructions:
Making the Shortbread Dough
1. In a large bowl, whisk together the all-purpose flour, sugar, and salt. This ensures everything is evenly distributed, which is crucial for a consistent cookie texture. Make sure there are no clumps of sugar or salt.
2. Add the softened unsalted butter to the dry ingredients. Using a pastry blender, your fingertips, or a stand mixer with a paddle attachment, cut the butter into the flour mixture until it resembles coarse crum extractbs. The butter should be incorporated, but you’ll still see small pieces of it, which is what will create that signature crum extractbly, melt-in-your-mouth texture of shortbread. Be careful not to overmix at this stage; we’re not looking for a smooth dough yet.
3. Divide the dough into four equal portions. This is where the magic of the rainbow begin extracts! Take one portion of the dough and place it in a small bowl. Add a few drops of one of your chosen gel food colorings. Using your hands, knead the dough gently until the color is evenly distributed. Be prepared for your hands to get a little colorful – it’s part of the fun! Repeat this process with the remaining three portions of dough, using a different gel food color for each. Aim for vibrant, saturated colors. If you want an even deeper hue, add another drop or two of gel coloring. Remember that gel food coloring is much more potent than liquid coloring, so start with a small amount.
Shaping and Baking the Cookies
4. Once all your dough portions are beautifully colored, it’s time to shape them. You can either roll each color into a log separately and then press them together to form a rainbow log, or you can layer the colors. For layering, take a sheet of plastic wrap and flatten one color of dough into a rectangle. Layer another color on top, gently pressing to adhere. Continue layering your colors until you have a stack of four colors. Once you have your layered or log-shaped dough, carefully roll it into a more uniform log shape, about 1.5 to 2 inches in diameter. Wrap the log tightly in plastic wrap and refrigerate for at least 1 hour, or until firm. This chilling step is vital; it makes the dough much easier to slice and prevents the cookies from spreading too much while baking.
5. Preheat your oven to 350°F (175°C). Line baking sheets with parchment paper. Once the dough is firm, unwrap the log and use a sharp knife to slice it into ¼-inch thick rounds. Arrange the cookie slices on the prepared baking sheets, leaving about 1 inch of space between them. Bake for 12-15 minutes, or until the edges are lightly golden brown. The centers should still look pnon-alcoholic ale. Don’t overbake, or your shortbread will become hard instead of tender. Let the cookies cool on the baking sheets for 5 minutes before transferring them to a wire rack to cool completely.
Decorating Your Rainbows
6. While your cookies are cooling, prepare your optional decorations. Melt the white melting wafers according to package instructions. You can do this in a microwave-safe bowl in 30-second intervals, stirring in between, or over a double boiler. Once melted and smooth, you can drizzle it over the cooled cookies using a spoon or a piping bag with a fine tip. Immediately sprinkle with rainbow nonpareils before the melting wafer sets. For an even more impactful rainbow, you can use food-safe edible markers to draw rainbow arcs on plain shortbread cookies after they have cooled, or use a thin amount of melted white chocolate and pipe rainbow stripes.
These Piped Rainbow Shortbread Cookies are a delightful project that yields beautiful and delicious results. Enjoy the process and the sweet, colorful outcome!
Conclusion:
There you have it! My Piped Rainbow Shortbread Cookies recipe is a guaranteed showstopper. These aren’t just any cookies; they’re a delightful explosion of color and buttery bliss, perfect for brightening any occasion. The simple yet elegant piping technique transforms classic shortbread into edible art, making them surprisingly accessible for bakers of all levels. The melt-in-your-mouth texture combined with vibrant hues makes them a joy to behold and even more of a joy to devour. I truly believe this recipe is a fantastic way to add a touch of magic to your baking repertoire. They’re ideal for birthday parties, baby showers, holiday gatherings, or simply as a cheerful treat to brighten a regular day. Imagin extracte these colorful beauties gracing your dessert table or being presented as a thoughtful, homemade gift!
Don’t be afraid to get creative with the colors or even experiment with adding a hint of flavoring like vanilla bean or almond extract to the dough. You could also try dusting them with edible glitter after baking for an extra shimmer. I encourage you to give these Piped Rainbow Shortbread Cookies a try – I’m confident you’ll love the process and the delicious results!
Frequently Asked Questions:
Can I make these ahead of time?
Absolutely! These cookies store beautifully in an airtight container at room temperature for up to a week. They actually taste even better after a day or two, allowing the flavors to meld.
What if my piping bag gets clogged?
If your piping bag is getting clogged, it might be because the dough is too cold and firm. You can try gently kneading the dough in the bag for a moment to warm it slightly, or you can briefly microwave the dough in a separate bowl for just a few seconds (be very careful not to melt it!) and then re-bag. Ensure your piping tip is also clear of any large crum extractbs.
Are there any alternatives to food coloring?
While artificial food coloring provides the most vibrant rainbow effect, you can explore natural alternatives like fruit and vegetable powders (e.g., beet for red, turmeric for yellow, spirulina for blue/green). Keep in mind that natural colors may be more muted and can sometimes subtly alter the flavor of the shortbread.
Piped Rainbow Shortbread Cookies
Delicate and buttery shortbread cookies piped in vibrant rainbow colors, topped with sparkling nonpareils.
Ingredients
-
2¼ cups all-purpose flour
-
¾ cup sugar
-
¼ tsp salt
-
1 cup unsalted butter, cut into pieces
-
Gel food coloring (4 colors of your choice)
-
1 cup white melting wafers
-
Rainbow nonpareils
Instructions
-
Step 1
Cream together the butter and sugar until light and fluffy. Mix in the salt. -
Step 2
Gradually add the flour, mixing until just combined to form a dough. -
Step 3
Divide the dough into four equal portions. Tint each portion with a different gel food coloring. -
Step 4
Roll each colored dough portion into a log and chill until firm. -
Step 5
Cut the chilled logs into desired cookie shapes. Arrange on a baking sheet lined with parchment paper. -
Step 6
Bake at 325°F (160°C) for 15-20 minutes, or until edges are lightly golden. -
Step 7
Allow cookies to cool completely on a wire rack. -
Step 8
Melt the white melting wafers according to package directions. -
Step 9
Dip or drizzle melted wafers onto the cooled cookies and immediately sprinkle with rainbow nonpareils.
Important Information
Nutrition Facts (Per Serving)
It is important to consider this information as approximate and not to use it as definitive health advice.
Allergy Information
Please check ingredients for potential allergens and consult a health professional if in doubt.